
Live streaming for anyone other than a national broadcaster used to be impossibly expensive. It’s certainly possible now, for remarkably small budgets, but even though an averagely competent crew can put together a multicam live stream now, I would hesitate to say it’s easy.
And the reason it’s not easy is not that of the sheer technical complexity of it. It’s because of the details.
So, we’ve had a few attempts at live streaming. And most of those weren’t terribly good, until our recent series. We’ve had issues with cameras, sound, lighting and – well, everything, really.
We weren’t discouraged by this and we’ve learned our lessons.
A new start
When we had a chance to start a new two-weekly series of live shows, sponsored by Matrox, we leapt at it. Not through some hubristic notion that we were somehow, miraculously, going to get it right this time, but because we figured that if we planned every aspect of it and built-in redundancy (you can’t just do another take when you’re live) we would do a decent job.
First of all, there was the venue. We’ve tried before to stream from our office, which is beige and generic, and despite our efforts to dress it up, it still looked like an unappealing office – however much we tried to dress it up. As the great western philosopher, Jeromy Clarkson once said, “you can put a painting in a cowshed, but it’s still a cowshed”.
We knew we weren’t going to hire a “proper” TV studio, much as we’d have liked to. There just wasn’t the budget for that. So, instead, we scouted around for an attractive-looking venue where the owners wouldn’t mind all the paraphernalia of a live TV production being strewn around once every two weeks.
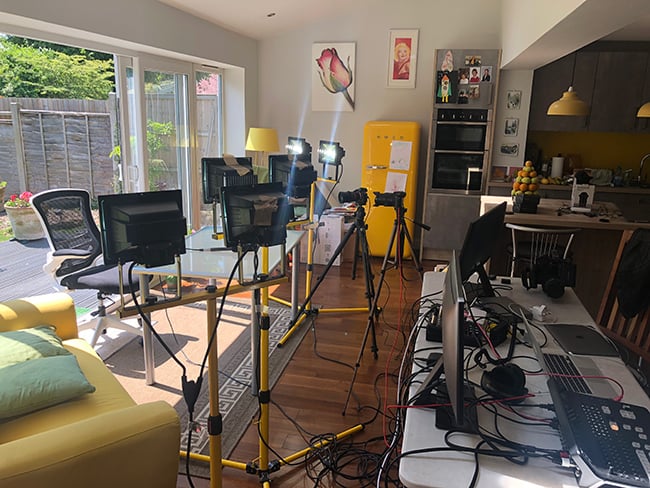
After nearly five minutes of looking, I realised that my kitchen fitted the bill quite nicely. It’s about 25 feet square and the kitchen itself only occupies about one-quarter of that space. The rest is completely open-plan and the furniture is easily movable. Along the garden side, there’s 22 feet of floor to ceiling glass, with opening sliding doors in the middle.
We figured that if the presenter were to sit with his or her back to the sliding doors, we’d have a very nice looking out-of-focus view of some green trees. On a nice day the doors can be open and there are great contrast and no reflections.
We wanted to light the set properly. So we needed lots of lights. This requirement conflicted with our budget. If there was to be only a single presenter, it would be relatively easy to light properly. But we wanted to be able to have one or more guests. And the light from the garden, attractive though it was, meant that we’d need even more artificial light to compete with the light streaming in through all that glass.

Live streaming on a budget!
Lighting it up
We didn’t have an answer to this until Simon Wyndham, RedShark’s Deputy Editor, suggested that we try some LED builder’s lights.
I was grateful for the suggestion but hugely sceptical, because cheap LED lights have a notoriously bad colour spectrum, and I didn’t want to appear on screen looking as though I was the love child of a banana and a nectarine.
But the lights were only £36 ($48) and each of these had two LED lamps on them. How bad would they have to be not to be worth the trouble of trying them out at that price? They even included stands.
We’re glad we did. They weren’t bad at all. Don’t ask me how. We haven’t analysed them. I’d almost rather not know, as long as the results are decent. We bought three of them – for a total of six lights – and, well, you can judge the results for yourself.
Would I prefer to have used professional lights? Yes, of course, I would. The builder’s lights are flimsy, unstable, and there is no way to adjust the intensity or the colour. But I take the fact that we received compliments about our lighting from viewers, who had no idea what a ridiculously bargain-basement technique we were using, to be a validation of our technique.
(I would caution that not all builders lights were the same and if you’re tempted to spend the same exotic budget as us (£108) you may not get the same results.)
We had to play around with the position and intensity of the lights and set the camera’s exposure to “manual”. If the balance between the external and the internal light wasn’t exactly right, the presenter would either be blown out or look like a silhouette.
Sounding off
I wasn’t prepared to make any compromises with the sound. We’ve ruined previous live shows because the sound wasn’t right. When you’re streaming on a budget it’s tempting to cut corners, but we’ve learned to never, ever do this with sound. On one occasion, we were putting audio from our microphones through an unfamiliar mixer that we’d found on a shelf. It looked OK, but five minutes before we went on air, the mixer failed and we were forced to improvise, without proper microphone pre-amplifiers. The results were dismal, with the sound too quiet and far too noisy. By far the biggest feedback we got from the show was that they couldn’t hear what we were saying, which just proves the point that if you haven’t got sound, then everything else is a waste of time.
This time, we’ve got AKG Lavaliers. These were certainly not cheap but they’re worth every penny, because they sound great and aren’t noisy. We put them through a decent mixer whose characteristics we’re used to, and then the output from the mixer is fed into the switcher, which gives us good metering as a “confidence” indicator.
We have backup microphones: hand-held Rhode shotguns – just in case the Lavaliers get damaged, and we have a backup mixer. Honestly, these are not expensive: a couple of hundred pounds will get you one with good mic preamps and enough channels to deal with most things.
We have used a variety of cameras, including mirrorless ones. We feed them into a Blackmagic ATEM HD Studio switcher which has proved to be solid and essentially marvellous for the job. Encoding for streaming was via a Matrox Monarch HDX which, again, has proved to be reliable and a very good encoder.
I’ll write about how we set these up, as well as more about our camera and lighting in another article.
Summing up
- Plan meticulously for a live stream. You can’t do retakes and if you’ve announced the event on social media, the last thing you want is a blank screen or a gorgeous-looking picture with no sound.
- Spend time finding an attractive location or set. Light it properly. You don’t have to spend a fortune: just be smart about it.
- Pay attention to the audio. Without it, you’re doomed.
- Have backups wherever possible. Buy extra cables because you will lose things (only to find them again the minute the show is finished).
- Use a good, reliable encoder.
That’s it for now. We’ll come back to this soon and talk about cameras, the video switcher and the encoder in more detail.
Tags: Production


Comments